No products in the cart.
Introduction
As photographers, we seek ways to improve our workflow and ensure that our final prints accurately represent the images we've worked hard to create. One of the most significant challenges we face is preserving the details in our prints, especially in the highlights and shadows. Today, we're excited to introduce a game-changing Photoshop action that will revolutionize your editing process by providing highlight and shadow clipping warnings and print clipping warnings to show you where you might lose detail in your prints.
Why Clipping Warnings Matter
Before diving into the specifics of my new Photoshop action, it's essential to understand why clipping warnings are crucial. Clipping occurs when the tonal range of an image is pushed beyond the limits of the medium (either the display or the print), causing a loss of detail in the highlights or shadows. This can lead to washed-out highlights, blocked-up shadows, or both. By using clipping warnings, you can identify and correct these issues before they become a problem in your final print.
What is Print Detail Clipping?
You may already be familiar with highlight and shadow clipping warnings, which are standard features in software like Lightroom and Adobe Camera Raw. These warnings alert you when a portion of your image becomes pure black or white. While this information is valuable, it can also lead to misconceptions.

Example from Lightroom with the highlight (red) and shadow (blue) clipping warnings turned on.
A common belief is that once you've adjusted your image to avoid clipping, it's ready for printing. While there's some truth to this, it's essential to consider that you may still lose detail in your final print if the highlights are excessively bright or the shadows are overly dark, even without clipping. Finding the right balance to preserve details in the highlights and shadows is crucial for optimal print quality.
Introducing the Ultimate Clipping Warning Photoshop Action
My new Photoshop action is designed to provide you with the information you need to create stunning, detail-rich prints. This action includes:
Highlight and Shadow Clipping Warning: This functionality displays any areas in your image where the highlights or shadows are clipped, resulting in a complete loss of detail. Clipped areas will print as pure black or white. Strangely, Photoshop lacks this crucial feature, and my action reintroduces it.
Print Clipping Warning: This advanced feature goes beyond the basic clipping warning by identifying areas within a specific luminance range that could lead to detail loss when printed. Luminance values in an image range from 0 (pure black) to 100 (pure white). Master printer Charles Cramer teaches that values between 0-10 in shadows or 90-100 in highlights often result in lost detail during printing. Previously, this information could be accessed using Photoshop's eyedropper tool to measure exact values. However, our action improves this process by giving a visual representation.

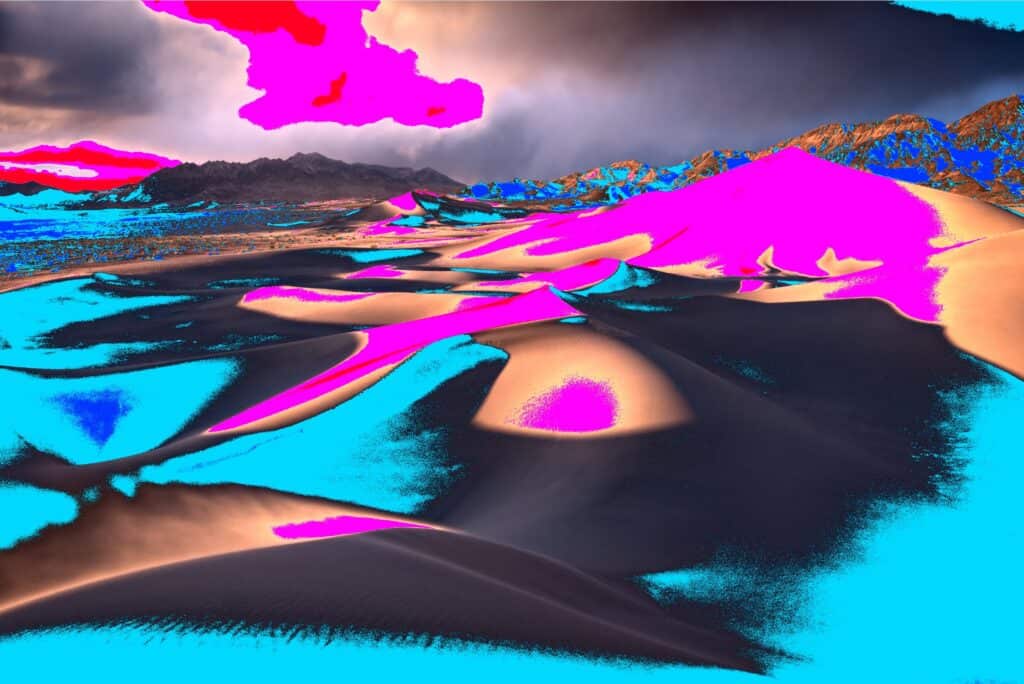
Print clipping warnings enabled
Here you can see the standard red and blue clipping warnings for pure white and pure black. Additionally, we have introduced magenta to indicate bright highlights with luminance values above 90 and cyan for shadow areas with luminance values below 10. This enhanced color-coding system provides a more comprehensive understanding of potential detail loss in both highlights and shadows.

The action conveniently adds a group with customizable Color Fill layers. You can modify the colors of each layer if they closely resemble the actual colors in your image.
You might also need to fine-tune the print clipping warning based on your printer. To do this, double-click the icon to the right of the layer for the "Blend If" feature. A new dialog will open, displaying the following options. Adjust the bottom slider to achieve your desired outcome. Note that the Blend If dialog operates on the RGB scale of 0-255 instead of the Lab scale of 0-100; in this case, 219 is equivalent to 90. You'll likely only need to alter these values if you are an experienced printmaker seeking more precise adjustments.

Is it acceptable to have clipped areas?
When using this action, it's crucial to consider whether you need to see detail in a particular area of your image. Oftentimes, it's perfectly acceptable for specific areas to lack detail. For instance, a cloudless bright sky doesn't necessarily require detail, and deep, dark shadows can sometimes create a more impactful effect. Ultimately, it's up to your creative vision to determine the importance of detail in specific areas. This action is a tool to help you make well-informed artistic decisions that align with your vision.
How to Use the Photoshop Action
- Download and install the action in your Photoshop Actions panel.
- Open the image you want to edit.
- Select the action from the Actions panel and click the "Play" button.
- The action will create a new layer with the clipping warnings displayed.
- You can use the information provided by the action to make adjustments to your image, such as modifying the exposure, contrast, or levels, until you're satisfied with the balance between highlights, shadows, and print detail. Just ensure that all adjustment layers go below the Print Clipping Warning group. If the adjustments are above the group, they will affect the clipping warnings and be inaccurate.
- Toggle the clipping warning layers on and off as needed to monitor your progress.
When you're happy with your adjustments, you can save your image and proceed with printing, confident that you've preserved as much detail as possible.
Conclusion
My clipping warning Photoshop action is a powerful tool that will help you create prints that truly capture the essence of your images. By providing accurate highlight, shadow, and print clipping warnings, you can make informed decisions during editing, ensuring that your final prints are as stunning as your original vision. Give it a try and see the difference it makes in your workflow and final results. Happy editing!
Download the Action
Sign up to receive our newsletter and download the actions.

After using your action to identify potential problems in the highlights and shadows what brush tool should I use to correct the problem?
As with anything in Photoshop, there are many different ways to achieve this. Using the burn/dodge tool on the background layer is the easiest way. Another way is to create a new blank layer, change the blending mode to Soft Light and paint with white to lighten, or black to darken.
Thank you very much, David, for creating this useful tool and sharing it so generously!